The oldest and most effective exercise in the world: push-ups. In this article we will explain why push -ups should not be missing from your training plan, which muscle groups you can train with them and how you can best integrate push-ups into your training plan. In addition, we talk about tools for push-ups, which mistakes should be avoided during the execution and give you useful tips to continuously improve. Finally, here are the 5 best push-up variations with instructions to perform at home!
Why should I include push-ups in my training plan?

Push-ups are one of the oldest fitness exercises in the world. Not only are they a very natural movement, but they are also a fundamentally very easy exercise to perform, which is why they lead to great success, especially for beginners. Push-ups also have great advantages in terms of training effect: On the one hand, they train a whole lot of different muscle groups at the same time, on the other hand, they are a wonderful exercise for training coordination, agility and sense of balance. In addition, you also promote the supporting muscles, which above all prevents and actively combats back pain.
Basically, push-ups are used both in strength training and endurance training and are an integral part of sports grams in school, sports teams and the military. The biggest advantage of push-ups is probably that they can be performed in many different ways without the use of tools. Different difficulty straights also ensure that the intensity can be continuously increased, which guarantees an increase in strength and endurance. Overall, pushup workouts always last a short time, but provide very good results for your body in the long run!
To our push-up grips!
[product="P-01001"]
Which muscle groups can I train with push-ups?

Basically push-ups are a very good whole body exercise. The main muscles trained are the deltoid muscle in the shoulder, the three-headed arm extensor in the upper arm and of course the small and large chest muscle. In addition, push-ups also train the muscle groups that serve to stabilize the body. Here, mainly the back extensor is involved, the thigh extensor, the small and large rhomboid muscle, the saw muscle, gluteal muscle and the abdominal muscles. In addition, however, there are over 200 other muscles involved in push-ups! So basically, it can be said that push-ups are a solid full body workout and therefore highly recommended.
Training schedule - How often and when should you train?

Got the urge and now you're eager to push your limits further? Then you need a plan! Basically, push-ups are a true all-around exercise and therefore, in one variation or another, can be integrated into any training plan. So whether you do Full Bodyweight, Calisthenics, Freeletics, weight training with weights or endurance training, push-ups should always be included.
In modern bodyweight programs like Calisthenics or Freeletics, push-ups are always automatically included. Either you train for time, which means that you have to do as many push-ups as possible in a period of 1 minute, for example, or according to the number of repetitions, in which case you have to complete a certain number of push-ups in several rounds. Bodyweight programs often use different variations of push-ups to increase the intensity and adapt the effort to your fitness level. It's not uncommon for normal pushups to become diamond pushups, negative pushups, or one-arm pushups. The longer you train, the easier it will be for you to perform the more difficult variations and the higher the maximum number of repetitions you can perform.
Bodyweight workouts can be integrated into your daily routine at any time of the day, so there are no prescribed rules for when you should do your workout. However, it is important that you train regularly so that your muscle is constantly exposed to a stronger stimulus, but also that you allow your muscles rest periods in which they can grow and adapt to the stimuli.
This means that after a hard push-up workout you should give your upper body a break for 1-2 days. But that doesn't mean you should just lie around! Instead of the upper body you can train the lower body. If you have divided your workouts into push-pull-leg, you could do a pull workout the day after.
Even if your goal is purely to improve your push-up technique, there are suitable training plans for you. The best thing to do is to start with a test: do a short warm-up, choose the push-up variation that suits you best (beginners should start with knees, advanced users can do normal push-ups right away) and then try out how many push-ups you can do in one go right off the bat. Once you have done this, you will have a minimum number to work with from now on.

A concrete pushup training plan could look like this: You train three times a week for 6 weeks, for example on Mondays, Wednesdays and Fridays. In the first week of training, you try to get above your previous minimum number all three times. In the second training week you do AMRAP: Each training session consists of 3 x 1 min workouts, with a one minute break in between. In these three minutes you try to do as many push-ups as possible (hence AMRAP: As many reps as possible). In the third week you practice the first variations: Can you maybe do a few negative pushups? Fist pushups or even diamonds? In the fourth week you start from scratch, but this time you set a new minimum number. How many reps can you do now without a break? More than in the first week? Great, then this is your new minimum number. Weeks 5 and 6 are the same as weeks 3 and 4.
Six weeks isn't a long time for consistent fitness training, but you'll probably be able to see a difference and have an idea of what regular fitness training might look like.
Another little tip: It's best to set a specific goal. For example, you could say that you want to be able to do 100 push-ups at a time by the end of the 6 weeks. This will keep you motivated and you will clearly see what you have achieved at the end of the time!
Does it make sense to do pushups every day?

Since this question is often asked, it will be answered briefly here. The answer is clearly: No. Of course, doing any exercise at all is better than not doing any exercise at all. However, doing push-ups every day would lead to an overload of the rotators in most people and can also result in tendonitis or other injuries. In addition, muscles always grow only in the resting phases, which means that your body needs these to be able to adapt to the new stimuli. So it is better to train 2-3 times a week, with at least one day of rest in between. This over several weeks gives your muscle enough stimulus to work and at the same time enough rest to grow.
Do I need tools to do push-ups?
The best thing about push-ups is that you can do them anywhere and you don't need anything more than a solid surface and ideally a mat to do them on. A lot of pushups can be done without any equipment and only for some, such as negative pushups, you need equipment (in the case of negative pushups, something to elevate your legs).

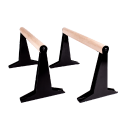
If you've already tried all the bodyweight variations and you're in the mood for a change, you could use Pushup grips might be useful and helpful for you here. By increasing the distance to the floor, you can perform the dynamic downward movement more deeply, which promotes your muscles more and thus brings an even greater incentive for growth. Plus, they're easier on your wrists because you don't have to bend them unnaturally. Plus, they're lightweight and easy to store, so you can easily pack them in your backpack and work out with them anywhere, whether you're camping or on vacation on the island.
Go to our push-up grips!
[product="P-01001"]
What mistakes should I avoid during the exercises?

Push-ups, when done correctly, are very good exercises for your body. However, if done incorrectly, they can - just like any other exercise in the world - harm your body and cause pain in your wrists, shoulders or, in the worst case, spinal discs. Because push-up workouts often involve a large number of repetitions, you should pay close attention to the correct execution of each exercise. Below you will find the 5 most common mistakes in the execution and tips on how to avoid them.
1st mistake: Wrong elbow angle
A beginner's mistake that is often taught incorrectly at school age: the elbow points in the wrong direction. Ask yourself the following question: If you were viewed from a bird's eye view, would your upper body form a "T"? If so, this position puts too much stress on your rotator cuff in your shoulders, which can lead to injury. The solution to this is to keep your arms as close to your body as possible and push up vertically from under your armpit. By doing this, you'll take the strain off your rotators while also promoting your chest, triceps, biceps, and upper and middle back, and you'll be safe in your execution.
Finally making progress in calisthenics training?
2nd Mistake: Sagging
A popular mistake that can easily happen, especially after many reps: You're statically holding yourself up with your arms extended, but your back is sagging. This should not be the case, because on the one hand you give away the training effect in the back and on the other hand you put too much strain on your lumbar spine and therefore risk back pain. Remember: head, back and hips must form a straight line during the entire exercise. The easiest way to achieve this is to squeeze your buttocks together during the exercise. This way you maintain the right body tension and stay in the correct position.
3rd mistake: Too fast release
Push-ups should always be performed slowly, both the push and the release movement. Especially with the latter, some people tend to just plop down. Not only does this take away a lot of the training effect, but it also makes it harder for you to get back up. If you lower yourself slowly, your movement acts like a spring and you can get back up more easily. And of course you train your muscles better this way than if you just let yourself fall.
4th mistake: unstretched wrists
Unstretched wrists can lead to pain during regular workouts. The solution to this is really simple: mobilize your wrists before and between each push-up session, for example by bending them against the floor in the opposite direction than they are during the push-ups.
5th mistake: Elevated push-ups or on knees
Basically, it's okay as a beginner to do push-ups on your knees or with your upper body elevated if you can't do proper ones yet. However, if you miss the jump and perform the exercise only in a simplified version, it will be difficult for you to get fit with the exercise. As a solution it is recommended to include an intermediate step, for example the push-up in the quadruped stance, a stance in which your knees are 5-10cm above the floor, but otherwise corresponds to the starting position of normal push-ups.
If you avoid the mistakes listed here, nothing should stand in the way of a clean execution and thus also of an early increase in strength and muscle. With push-ups, as with all other exercises, the correct execution is what counts.
Tips to get better and better

Here we have compiled a few golden rules for you, so that you always make progress with your push-up workout.
1. practice the execution
The most important part of any exercise is its execution. We've already told you how to do push-ups correctly and what mistakes to avoid. Now make sure that you stick to it and let your training partner check you regularly. Especially if you have already done a few push-ups, it is not always easy to perform the exercise in the best possible way. The rule here is: less is more!
2. the correct viewing direction
It helps if you don't look directly at the floor, but more to the front. This increases the range of motion, your chest can go deeper and the exercise becomes more comfortable to perform.
3. do not forget to warm up
Same procedure as everytime: warm up before the workout! Especially with push-ups, the load on your entire body is quite high, so it is important that you are well warmed up before you start. Stretching, by the way, doesn't hurt either!
4. variation
There are countless different types of push-ups, why use just one? Try your hand at other push-up variations too!
5. divide air
Breathing techniques help especially with heavy weight exercises. But they are also a useful little helper during push-ups. Take deep breaths on the way down and explosive exhales on the way up. This makes it easier for you and strengthens your condition!
Top 5 push-up variations plus execution
Classic push-up

In the classic push-up, your body forms a straight, ascending line from your legs to your head. Keep your arms as close to you as possible and let your elbows point toward your feet as you lower. Lower yourself down, paying attention to your breathing as you do so, and a few inches above the floor, push yourself back up to the starting position while exhaling explosively. Take a short breath and repeat the exercise.
Want to learn push-ups? Watch our YouTube video "How-To: First Push-Up [Beginner Tutorial]" to learn how.
Diamond pushups

For the Diamond Pushups, place your hands side by side on the floor at chest level so that the thumbs and index fingers of the two hands together form a triangle. Then lower yourself down in a straight line and push back up in the same way. The diamond push-ups mainly challenge your triceps muscles and therefore help you build up the muscles in your arms.
Push-ups with push-up grips

If you want to go beyond the bodyweight push-ups, you can use Push-up grips like these can be just the right tool for you. The higher distance from the floor causes you to lower yourself, which excites your muscle more than a normal pushup. Be careful not to overdo it, though, and never lower yourself so far that it feels uncomfortable. There's a big difference between regular push-ups and push-ups with grips, and it will pay off in looks.
Go to our push-up grips!
[product="P-01001"]
Triceps push-up on fists

The starting position of this variation is the same as the starting position of the classic push-up, with one difference: instead of having your hands flat on the floor, here you have them clenched into fists so that your thumbs are facing forward and your palms are facing each other. The advantage of this variation is above all the relief of the wrists.
Negative Pushups

Here, too, the starting position is the same as in classic pushups. The difference here is that your feet are positioned on an object (such as a chair or a stair climber) so that your body forms a falling line from back to front. With negative pushups you focus your training mainly on the upper chest muscles.
Tiger Bend Pushups
Tiger Bend Pushups are particularly difficult to perform, but they work both your chest and arm muscles very hard. The difference between normal and Tiger Bend Pushups is that in the lowered position, when your chest is just above the floor, you rest your elbows on the floor for a brief moment. Then go back to the normal lowered position and push yourself back up to the starting position. If Tiger Bend Pushups are too difficult for you, you can start by performing them on your knees.
One-arm pushup

The supreme discipline among the pushup variations. Position your arm in the middle of the floor at the level of your chest. It is important that you keep your balance. You can also extend your free arm a bit to the side or place it on the floor as well, but without using it during the movement!
Conclusion
Push-ups are a brilliant, versatile and improvable exercise that can be used anywhere. The most important thing is a clean execution, so you not only ensure a healthy look of your body butLiegestützen Leicht Gemacht - Dein Perfekter Trainingsplan Für Mehr Liegestütz beugst also back pain and other discomfort.
Are you looking for the right calisthenics accessories for your calisthenics workout?
We at Pullup & Dip offer you high quality calisthenics accessories for indoor & outdoor.
Recommended articles:
Pushup Grips - The Top Benefits and Exercises with Pushup Grips
 Other Equipment
 Gripping Aids
 Bandages
 Tapes
Tapes
